Dive Computer Downloading
Direct Download Support for selected Dive Computers

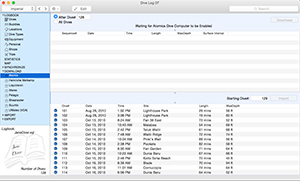
Once the download has finished, the list of dives found on the dive computer will be shown in the top window. In that window, select one or all of the dives you want to import into your logbook. Enter a new starting dive number to add them to the end of your logbook, OR enter an existing dive number (or click on a dive in the bottom window) to merge your downloaded dive computer information into a dive you have already entered. This way, you can log your dives whenever you want, wherever you want, and then add in the dive computer details later! You can also log your dives using your iOS device, then sync your log to the desktop, and then merge in the dive computer information. This let's you log your dive while you're "there" and thinking about your dive.

Merge new dives from Dive Log for iOS and dive information from your dive computer (PDC)
Quick dive logging using DiveLogManager/DiveLogDT and merging in dive information from your dive computer (PDC)

1) Import both of the dives into your logbook so that you have eg: Dive# 100 and Dive# 101. Go to the Dives panel and then the Detail tab and into Editing Mode. Change the dive number for Dive#101 to 100. So now you have 2 dive number 100's. This way, all the information from your dive computer is preserved.
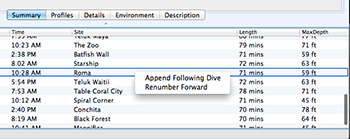
2) Import both of the dives into your logbook so that you have eg: Dive# 100 and Dive# 101. Go to the Dives panel and select Dive# 100 so that it is showing. Now bring up the menu (Right click or Control click) on the dive in the lower window and select the menu item “Append Following Dive”. After confirming the popup questions, the dive computer information from Dive# 101 will be appended to the end of Dive #100 and the original Dive #101 will be deleted. This is how you can merge two dive computer profiles together into one dive.
3) If needed, you can select the first correctly numbered dive in the list, and then select “Renumber Forward”. A popup will show you all the subsequent dives in Date/Time order and what the original and new dive numbers would be. You will be given the opportunity to cancel or click “OK” to confirm the change.
Device Specific Download Details

Your Cobalt and/or Cobalt 2 came with a USB/Charger Adapter and a USB cable. Plug the USB side of the Adapter into the terminal socket on the back of the Cobalt, plug the mini end of the USB cable into the Adapter, and then plug the other end into a USB port on your Mac. Navigate the Cobalt's main menu into Settings and then to System Information. Select USB and then press the Select button again to enable USB Communication. Once your Cobalt has been enabled for USB, the "Download" button will become enabled. Click it and Dive Log Manager will start downloading dives stored on the Cobalt. Once finished, the list of dives stored on the dive computer will show in the upper window. This list of dives will remain until another download is started so you may import dives in multiple stages if you wish. They will not remain once you Quit Dive Log Manager.

To download any Cressi dive computer with Dive Log Manager/DiveLogDT, you must also first install the Cressi specific software found on their website here. Note that their software is specific to the version of Mac OSX that you are running, and that it includes a kernel device driver that needs to be installed. You will be required to reboot your Mac twice before you are finished. You must also run the Cressi logbook software at least once to ensure that their package installation properly finishes the device driver install. If you are having trouble downloading with our software, try downloading with the Cressi software until it works there, and then come back to Dive Log Manager/DiveLogDT and try downloading again. You must Quit the Cressi software before attempting a Download with Dive Log Manager/DiveLogDT.

Check our IMPORT page for information about downloading Divesoft brand dive computers.

The OSTC2 models and the OSTC3 models will download via the included USB cable. Once you plug the cable in, the "Download" button will enable. The OSTC Sport and OSTC4 will download via Bluetooth instead. You must "pair" your OSTC model with your Mac first before trying to download it. To pair it, start the "System Preferences" application and click on the "Bluetooth" button (or "Open Bluetooth Preferences" by clicking on the Bluetooth icon in the top toolbar). Now start Bluetooth on the Sport/OSTC4 and follow the instructions.

Download of Liquivision dive computers is available for MacOS 10.9 and greater only. If you have the Liquivision "PC Interface" accessory, you can download your Lynx, Kaon, Xen, or Xeo dive computer. When you plug the unit into your Mac, the Download button will enable. Then, put your dive computer into PC download mode, place it near to the PC interface unit in the indicated orientation, and then click the Download button. All of the dives on your dive computer will be downloaded and you can select/choose which ones to import into your logbook.

(NOTE: The Mares USB download cable is REQUIRED to be able to download these computers. There is no need to install any drivers - the application will communicate with the dive computers directly)
The Mares "DRAK" cable will have an "end" specific to your dive computer that plugs into the "mini USB" side of the cable. Once the entire cable is plugged into your Mac, the "Download" button will become enabled. Select whether you want to download ALL the dives on your dive computer, or select a Dive Date/Time to download after. Select which model of dive computer you have from the popup menu. Put your dive computer into transfer mode and then click the download button. Dive Log Manager will show a progress bar while the dive computer is being downloaded, and then the list of downloaded dives will show in the top window. This list of dives will remain until another download is started so you may import dives in multiple stages if you wish. They will not remain once you Quit Dive Log Manager. If you get an error while transferring, and everything looks like it should be fine, try at least one more time.
If you have a 3rd party cable to download your Mares computer, you must also have a kernel device driver from them for that cable, which provides a serial port for applications to use it. To configure Dive Log Manager/Dive Log DT to use a serial port to download instead of using the Mares cable, press and hold the Command/Apple key while clicking the Download button (which will be renamed to Configure). Dive Log Manager/Dive Log DT will scan for possible USB serial ports and give you a list which you can select from. If the correct one is not there, you can type in the name of the one you want to use.


Pelagic Pressure Systems ::
Apeks - DSX
Aeris - Atmos 2, Atmos AI, Elite, XR-2, Epic, Elite T3, Manta, Compumask, F10, Atmos AI 2, A300 AI, A300, A300 CS, F11
Aqualung - i100, i200, i200C, i300, i300C, i450T, i550, i550C, i750TC, i770R, i330R
Genesis - ReactPro, ReactPro White
Oceanic - Versa Pro, Pro Plus 2, VT Pro, Veo 200, Veo 250, Veo 180, Atom 1.0, VT3, Atom 2.0, Geo, Datamask, OC1, Veo 1.0, Veo 2.0, Veo 3.0, Pro Plus 2.1, Geo 2.0, VT4, Atom 3.0, OCS, VT 4.1, Atom 3.1, Pro Plus 3, OCi, VTX, ProPlus X, Geo Air
Sherwood - Wisdom, Insight, Wisdom 2, Insight 2, Wisdom 3, Amphos, Vision
Sub gear - XP Air
Tusa - Element II, Zen, Zen Air
Several brands of dive computers, including Aeris, Aqualung, Genesis, Oceanic, Sherwood, Tusa, and others are collectively known as Pelagic Pressure Systems dive computers. Aeris, Aqualung, Genesis, Oceanic, and Sherwood all sell their download cables separately from the dive computer. It has a USB port on one end, and a connector specific to your dive computer on the other. You will need to find the correct cable for your dive computer.
The connection between the cable and the dive computer is the "weakest link" for these computers. It's very easy to not have a proper connection, meaning that data does not transfer and the download fails. If you are having trouble downloading your dive computer, this is the first place you should check. Remember that some models can have the connector to the dive computer itself plug in upside-down! If it’s not working, double check this connection.
If you have a 3rd party cable to download your Pelagic computer, you must also have a kernel device driver from them for that cable, which provides a serial port for applications to use it. To configure Dive Log Manager/Dive Log DT to use a serial port to download instead of using the Pelagic cable, press and hold the Command/Apple key while clicking the Download button (which will be renamed to Configure). Dive Log Manager/Dive Log DT will scan for possible USB serial ports and give you a list which you can select from. If the correct one is not there, you can type in the name of the one you want to use.
DiveLogDT/Dive Log Manager can also support downloading a number of Pelagic dive computers via Bluetooth Low Energy (BLE) and therefore you don't need a USB cable. Just select "All BLE" in the Vendor menu if your dive computer supports it.

All of the Ratio dive computers come with a USB cable that you can connect to your Mac. The built in device driver should work thereby giving a serial port that Dive Log Manager/DiveLogDT will look for.
The iX3M series of dive computers also work using Bluetooth Classic. If your Mac supports Bluetooth Classic, you can pair your iX3M dive computer with your Mac by opening the Bluetooth Preferences and then putting your dive computer into Bluetooth mode. This will create a "Bluetooth Serial Port", that Dive Log Manager/DiveLogDT will use to download the dive computer.

The original Shearwater line of dive computers used "Standard" or "Classic" Bluetooth technology to download logbook information so no cables are needed. All modern Shearwater dive computers starting with the Perdix AI is the first model that uses ONLY "Low Energy" Bluetooth or BLE. The Petrel 2 and the Perdix can use both types of Bluetooth. On the Shearwater Download panel, you first choose which type of Bluetooth you want to use to Download your particular model.
Your Mac computer must have the needed Bluetooth support builtin - most, but not all Macs do. Your Shearwater dive computer will need to be put into "Download mode" first before clicking the download button.
The first time you connect with your Shearwater dive computer using Classic Bluetooth, it may take some extra time to make the initial connection while the two devices "pair". Once your Mac and the Shearwater have paired, all future connections will happen much faster. If you are already using the Shearwater Desktop software, the two devices may already be paired. Disconnecting from the dive computer, manually or after downloading, takes about 10 seconds to complete. We have seen some problems pairing initially with a Perdix. If you are having problems getting connected initially, we recommend using the “Open Bluetooth Preferences” menu item and pairing it with the Mac manually, and then trying the download again.
We have also seen some problems switching between "Classic" and "Low Energy" Bluetooth when downloading from the same device. While technically this is feasible, the macOS Bluetooth module get's confused. If you "Turn Bluetooth Off" on your Mac, wait a moment, and then "Turn Bluetooth On" again, you effectively reset the Bluetooth module on your machine and all will be well again.
The modern Shearwater dive computers support "selective downloading" which means that initially, just the basic dive date, time, and depth information of all existing dives on the unit are downloaded at first. Then, simply select which dives you wish to fully download in the top window, and then click the "Import" button. Once you've clicked Import, then all of the profile information from only those dives are downloaded from the dive computer and imported into the logbook. This method makes the download process much faster as you don't have to spend time to re-download dives already in your logbook.
Predator models do not have this capability so you will download all the memory each time, and only select the dives you have not yet logged to import into your logbook.

(NOTE: The Suunto USB download cable is REQUIRED to be able to download most of these computers. There is no need to install any drivers - the application will communicate with the dive computers directly)
Plug the USB end of the cable into your Mac and plug the other end into your dive computer. Once you insert the Suunto download cable into a USB port on your Mac, the "Download" button will become enabled. Some of the above dive computers will go into "transfer" mode when you plug the other end of the cable into it, but others require you to set the dive computer into "Transfer Mode" manually. Check your Suunto User Manual if you are not sure. Select whether you want to download ALL the dives on your dive computer, or select a Dive Date/Time to download after. Select which model of dive computer you have from the popup menu. Then click the "Download" button to start the transfer process. Dive Log Manager will show a progress bar while the dive computer is being downloaded, and then the list of downloaded dives will show in the top window. This list of dives will remain until another download is started so you may import dives in multiple stages if you wish. They will not remain once you Quit Dive Log Manager. If you get an error while transferring, and everything looks like it should be fine, try at least one more time.
(NOTE to D4i, D6i, D9tx users: Suunto has a "new" cable you will need for these models, the original D3,D6,D9 cable will NOT work. The "new" cable is painted red on the inside of the connector that attaches to the dive computer.)
If you have a 3rd party cable to download your Suunto computer, you must also have a kernel device driver from them for that cable, which provides a serial port for applications to use it. To configure Dive Log Manager/Dive Log DT to use a serial port to download instead of using the Suunto cable, press and hold the Command/Apple key while clicking the Download button (which will be renamed to Configure). Dive Log Manager/Dive Log DT will scan for possible USB serial ports and give you a list which you can select from. If the correct one is not there, you can type in the name of the one you want to use.
If you have a model that supports downloading via Bluetooth like the EON Steel or EON Core, then no cable is required.

(REQUIRES: ScubaPro USB IrDA Adaptor shown here) (NOTE: The ScubaPro USB IrDA dongle is REQUIRED to be able to download these computers. There is no need to install any drivers - the application will communicate with the dive computers directly)
Once you insert the ScubaPro/UWatec USB IrDA adaptor into a USB port on your Mac, the "Download" button will become enabled. Turn on your dive computer and place it's IrDA port about 3 to 6 inches or 7 to 15 centimeters away from the IrDA port on the adaptor. Make sure that the dive computer is supported in such a way that it won't move (very much) while downloading. Then click the "Download" button to start the transfer process. Dive Log Manager will show a progress bar while the dive computer is being downloaded. Do not move the dive computer until the download has finished. This list of dives will remain until another download is started so you may import dives in multiple stages if you wish. They will not remain once you Quit Dive Log Manager.
Some of the UWatec dive computers, such as the Galileo series, have large amounts of memory in them in order to store large amounts of dive information. It make take Dive Log Manager up to 10 minutes to download all of the memory, so you may need to be patient.
Some of the UWatec dive computers, such as the Smart series, can sometimes get "lost" in the middle of a transfer and become unresponsive. If you do not see the progress bar making any progress for 20 to 30 seconds, the dive computer may be stuck. If this happens, you can click the cancel button and then click the download button again to re-start the transfer. Optionally, you can restart the dive computer as well, but this is not always necessary.
ScubaPro / UWatec (Serial) - Chromis, Meridian, Mantis, Mantis 2, G2, Aladin Sport Matrix
You will need the "Optional Communication Cradle" from ScubaPro to be able to download your dive computer. It is sold separately from ScubaPro and has a USB connector at one end. Once you plug the USB cable into your Mac, the Download button should Enable.
The ScubaPro G2 comes with it's own USB cable but does not use a serial port like the others. For the Aladin Sport Matrix, the cable is extra. Select 'G2 (USB)' or 'Sport (USB)' in the dropdown model menu. Once you have plugged in both ends of the cable, press the button on the dive computer to enable "Log" mode and the Download button will enable. You can also use Bluetooth Low Energy (BLE) to download the G2 or Sport. You will find it substantially slower to download than when using the USB cable, however it may be more convenient. To download using Bluetooth, select the 'BLE' version of the model in the model menu. Press the Menu button on the dive computer and scroll until you see the Bluetooth entry, select it, and then press the 'ENTR' button. Once the dive computer has finished it's initialization, it will display 'Ready' and you can start the download process.
The first time you connect your Mac your dive computer using BLE, you will see a popup window asking you to enter a pairing code. Just enter the 6 digit code that is displayed on the G2/Sport into the popup window on your Mac. Future connections will not require this - it's only needed the first time. Under macOS, scanning for the G2/Sport via BLE can take a surprising amount of time - up to 30 seconds. Please be patient while this process is happening. Once you have connected to the G2/Sport, future connections during the same session will be faster. But once you have Quit and restarted Dive Log Manager/DiveLogDT, the scanning process will be required again.
If you have successfully connected to your G2/Sport using BLE and have been downloading your dives to your Mac, but find that one day you can no longer successfully connect with BLE, try re-pairing to the dive computer. Open the System Preferences application and open Bluetooth Preferences. Look for the G2/Sport in the list of Devices, and then click the small 'x' next to the name to remove the existing pairing. You will need to re-pair again when you try to reconnect, however you will have a better chance of success now.
Note :: Other USB IrDA dongles/adaptors may work with DiveLogDT/Dive Log Manager if they use the same chipset(s) as the official ScubaPro/UWatec one, but we are not able to support all makes and models of adaptors. Contact us for a list of known 3rd party IrDA dongles. If you already own one, you can try it out. If you are thinking of buying another, less expensive adaptor, try to find out the chipset it contains first, and contact us with the information.
One further Note :: We can also support downloading certain ScubaPro/UWatec Memomouse based dive computers such as the UWatec Air Z. Please contact us if you would like more information about how you can do this.
And another Note :: If you are making the “leap” from a Windows based desktop to a macOS X desktop, we offer our customers a “one time” conversion of your SmartTrak logbook to a Dive Log/Dive Log Manager/DiveLogDT based logbook. Just send us your “slg” logbook file and we will send you back a compatible (sql) logbook file for you to start with.
